Become a broker
Integrate into MixPay Checkout page with your wallet payment method.
Introduction
This article will guide you how to use MixPay Protocol to integrate your payment method into the MixPay Checkout page.
Terminology explain
What is "MixPay Protocol"?
Please watch this YouTube Video.
What is a MixPay payment broker?
Thanks to MixPay Protocol's flexible design, one payment method can have multiple providers, each provider is a MixPay payment broker.
Why dose one payment method need to have multiple providers? Because due to local laws and license restrictions, one payment method may be restricted to local merchants.
For example, Binance Pay Japan may only available for Japanese merchants.
Overview
All you need to do is follow these four steps:
Step 1: Create a Mixin robot
Step 2: Develop an interface for MixPay calls
Step 3: Notify MixPay that it has arrived
Step 4: Turn on the necessary configuration
Frequently Asked Questions
All the steps will be explained below.
Step 1: Create the Mixin robot
MixPay is a product developed based on the Mixin network, using Mixin's robot to transfer money, which can ensure that the transfer will be instant and safe.
First we need to have a Mixin robot:
- Go to https://mixin.one/messenger , download and install Mixin Messenger App;
- After installation, register with your mobile phone number. This is your main account, you need a main account to create a bot;
- Then visit the Mixin developer's Dashboard , use the main account registered above to log in;
- Click "New App" to create an app (OAuth is not used, so the OAuth link can fill in the link of your website);
- Once the app has been created, click on the top navigation " Secret " and click the two buttons indicated by the arrow below.
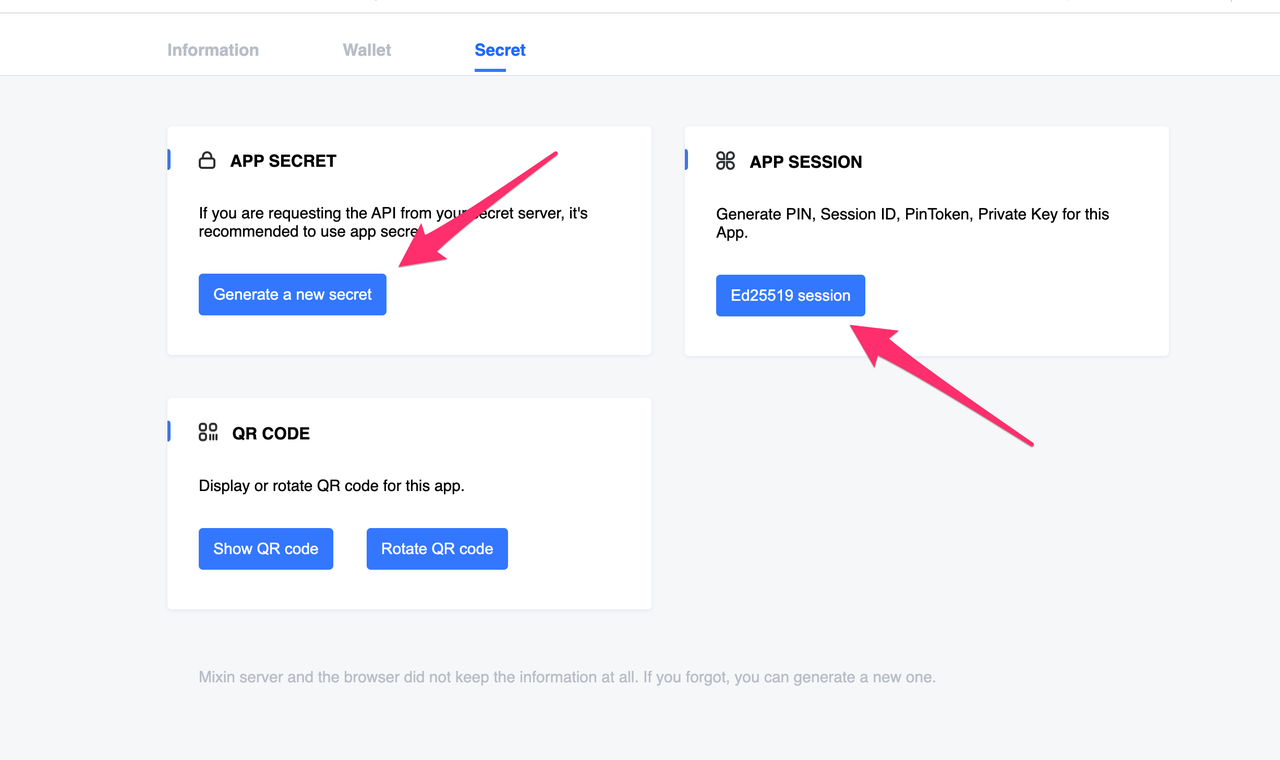
APP SESSION will get:
{
  "pin": "XXXXXX",
  "client_id": "c8X1xxxx",
  "session_id": "08e0e8xxxxxx",
  "pin_token": "xxxxx",
  "private_key": "xxxxxx"
}
APP SECRET example:
# client_secret
980XXXXa05cd357Xe8c5d1089d0a6a10bXXXXXXXXXXXXXXXXXX
Please copy and paste the above information to a safe place. This information will be used when the robot calls the Mixin API.
Note: "APP SESSION" and "APP SECRET" must be kept safe, this information has the authority to transfer your robot assets.
Step 2: Develop APIs for MixPay to call
Intro
The working mechanism of MixPay Protocol is that the payment provider provides an API for MixPay, which defines the request parameters and return format in advance to ensure that the two systems are coordinated.
Below are the specification details.
1. API requirements
All APIs must communicate using HTTPS, to ensure secured connection.
The response format must be JSON format , such as:
{
    "code": 0,       // if success is 0, if fulare with corresponding error code
    "success": true, // boolean value
    "message": "",   // if fulare with a message, else empty string
    "data": {        // contain business logic data
        "XXXX": "XXXX"
    }
}
2. mixpay/assets/range API
API description
When the MixPay Checkout Page is initialized, this API is called to check for:
Payment permission - whether the current
payeeId(merchant) has permission to use it;By default, MixPay will open your payment method to all recipients (merchants).
In some cases, due to local laws and license restrictions, you may only be able to open to certain merchants. This allows you to limit the use to certain payees.
Payment Limit - Your payment method, supported limits.
The payment limitation is like saying that $0.001 is too small and $100W is too large.
MixPay needs to know the scope of allowed payments in order to interact with the end user.
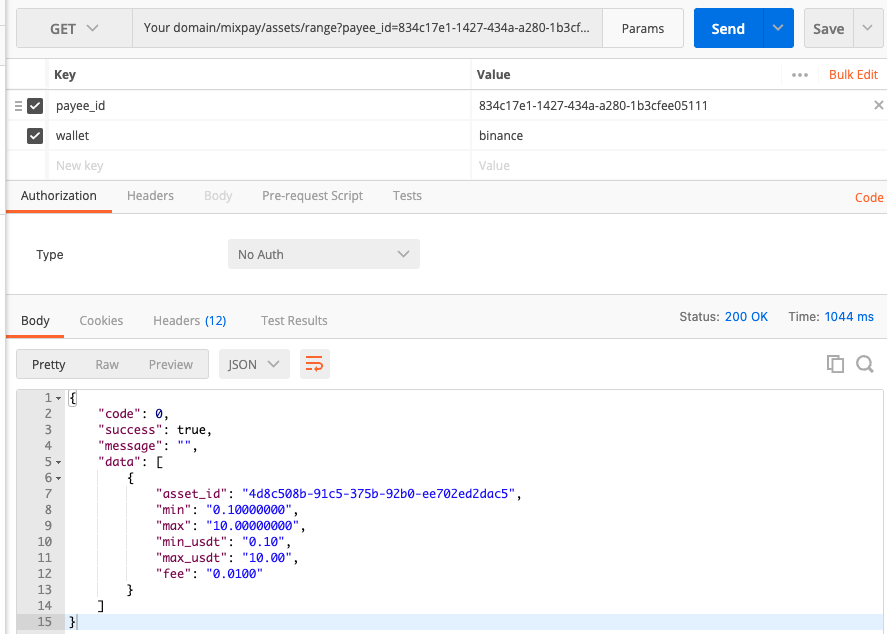
The following showcase the request and response in the Postman:
Definition:
GET HOST/mixpay/assets/range?payee_id=xxx&wallet=xxx
Request parameters:
| Parameters | Types of | Conditions | Description |
|---|---|---|---|
| payee_id | String 32-36 | required | MixPay's payeeId, the merchant's Mixin ID, in UUID format. |
| wallet | String 20 | required | Wallet indentifier used for payment. There are currently binance. Customization is possible, but you have to notify the MixPay team. |
Response:
{
    "code": 0,
    "success": true,
    "message": "",
    "data": [
        {
            "asset_id": "4d8c508b-91c5-375b-92b0-ee702ed2dac5",
            "min": "0.10000000",
            "max": "10.00000000",
            "min_usdt": "0.10",
            "max_usdt": "10.00",
            "fee": "0.0100"
        },
        {
            "asset_id": "c6d0c728-2624-429b-8e0d-d9d19b6592fa",
            "min": "0.00000440",
            "max": "0.00010000",
            "min_usdt": "0.10000000",
            "max_usdt": "2.05",
            "fee": "0.0100"
        }
    ]
}
Response fields explain:
| Fields | Types of | Conditions | Description |
|---|---|---|---|
| asset_id | String UUID | required | Mixin supported assets, see Mixin's asset interface. |
| min | float | required | Minimum amount of currency allowed to be paid. |
| max | float | required | The maximum number of currencies allowed to be paid. |
| min_usdt | float | required | Minimum USDT value in currency allowed. |
| max_usdt | float | required | Maximum USDT value in currency allowed. |
| fee | float | required | This is the percentage of fees you will charge. 0.01 for 1%. |
Regarding the returned fee field - you can charge an extra fee on the payment link provided to the user, but you need to provide the proportion of the fee charged in this API, MixPay will show the user before the user chooses your payment tool to pay. That is, 0.01 will show 1%
User permission
As mentioned above, there are times when you need to restrict the use of your payment products to certain merchants due to local laws or payment license restrictions.
You only need to check payee_id parameters, and if it is not allowed, return the following response:
{
    "code": 11001,
    "success": false,
    "message": "No permission",
    "data": []
}
3. mixpay/create_order API
API description
MixPay calls this API to create a payment order on your system.
After passing the MixPay Checkout Page initialization phase (through API mixpay/assets/range), your payment will be displayed on the page. When the user clicks Pay with your wallet, we will call this interface to create a payment order.
MixPay initiates a request, passing the necessary parameters such as the price and currency to be paid, and you need to return the link that allows the user to pay directly.
After MixPay receives your response, it will show it to the end user, using the right payment link depending on which environment they are in (PC browser, mobile browser, or inside the wallet).
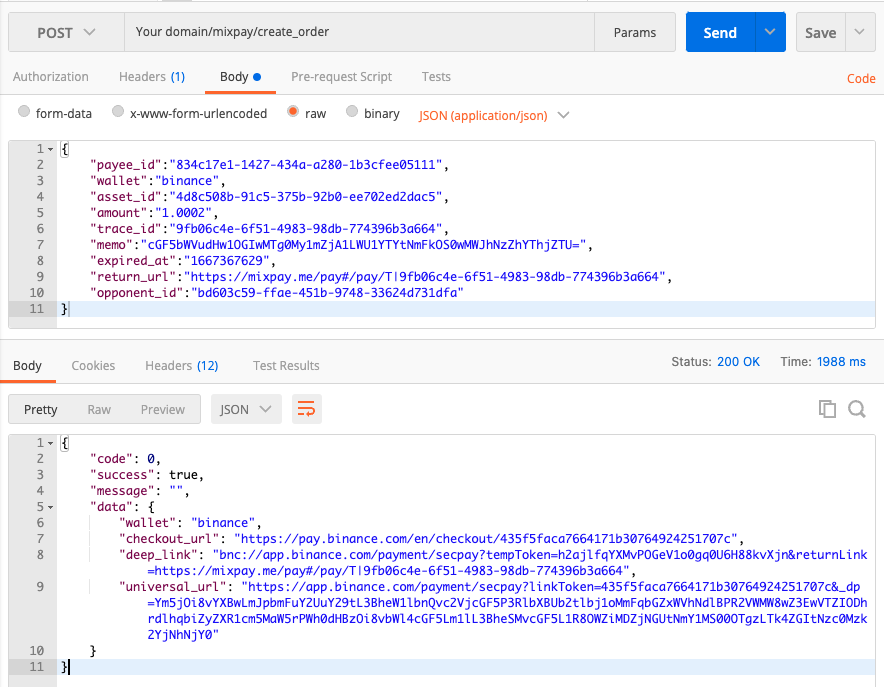
Here is an example of a request using the Postman tool:
API definition:
POST HOST/mixpay/create_order
Request parameters:
| Parameters | Types of | Conditions | Storage | Description |
|---|---|---|---|---|
| payee_id | String 32-36 | required | MixPay's PayeeId, the merchant's Mixin ID, in UUID format. | |
| wallet | String 20 | required | The name of the wallet used for payment. There are currently binance. Can be customized, see step 4. | |
| asset_id | String UUID | required | Yes | Digital asset UUID, defines the currency MixPay expects to receive. |
| amount | float | required | Yes | The amount of money to be collected by MixPay. |
| trace_id | String UUID | required | Yes | The MixPay system uses this trace_id to identify a payment order. |
| memo | String 200 | required | Yes | The memo is also an important identifier for identifying orders in MixPay. |
| expired_at | Timestamp | required | Yes | The deadline for payment; if the user pays after this time, please refund the user by yourself. |
| return_url | String 200 | required | After the user pays successfully, the page will jump to this link. You must fire an HTTP 302 redirect. | |
| opponent_id | String UUID | required | Yes | MixPay's Mixin robot UUID. |
The above fields with a column "Storage" defined "Yes" needs to be stored. Please store them in the database. We will use them when calling Mixin API to transfer funds to MixPay later.
Response:
After your server receives the request, it creates a payment order in your system and returns the following response:
{
    "code": 0,
    "success": true,
    "message": "",
    "data": {
        "checkout_url": "https://pay.binance.com/en/checkout/435f5faca7664171b30764924251707c",
        "deep_link": "bnc://app.binance.com/payment/secpay?tempToken=h2ajlfqYXMvPOGeV1o0gq0U6H88kvXjn&returnLink=https://mixpay.me/pay#/pay/T|9fb06c4e-6f51-4983-98db-774396b3a664",
        "universal_url": "https://app.binance.com/payment/secpay?linkToken=435f5faca7664171b30764924251707c&_dp=Ym5jOi8vYXBwLmJpbmFuY2UuY29tL3BheW1lbnQvc2VjcGF5P3RlbXBUb2tlbj1oMmFqbGZxWVhNdlBPR2VWMW8wZ3EwVTZIODhrdlhqbiZyZXR1cm5MaW5rPWh0dHBzOi8vbWl4cGF5Lm1lL3BheSMvcGF5L1R8OWZiMDZjNGUtNmY1MS00OTgzLTk4ZGItNzc0Mzk2YjNhNjY0"
    }
}
It should be noted that when you create an order, the amount of the order, that is, the final price that needs to be paid by the end user, needs to be amount +fee, the amount needs to be transferred to MixPay, and the fee is charged by the service you provide. Of course, you can also not charge any processing fee.
Response fields explain:
| Fields | Types of | Conditions | Description |
|---|---|---|---|
| checkout_url | String | required | The payment link opened on the PC browser. |
| deep_link | String | A link that evokes App Deep link payment. If there is no such link, return an empty character. | |
| universal_url | String | The payment link opened by the mobile end. If there is no such link, return an empty character. |
Insufficient balance
In the process Step 3: Notify order completed. After the user has paid and you have received the money, you need to transfer money to MixPay's Mixin robot. So before that, you need to make sure that your Mixin robot assets are greater than the amount required for this transfer.
You can view the robot's assets balance through the Read Asset or Read Asset List API provided by Mixin. The balance field in the response of these two APIs must be greater than the amount parameter requested by MixPay.
A recommended practice is to use asynchronous operations - on the server side, set up a scheduled worker request for the Read Asset List API every 10 seconds to synchronize your Mixin bot's assets to the local database. In your business logic code of mixpay/create_order, you can check the balance directly from the database to improve the response speed.
A bot can have multiple assets, and the asset_id parameters requested by MixPay are the same as the asset_id parameters required to request the Mixin API.
When the amountis greater than the balanceof the robot asset, return:
{
    "code": 11002,
    "success": false,
    "message": "This payment is unavailable.",
    "data": []
}
When such errors occur, it is recommended that you have a notification mechanism in your code, to notify the relevant managers to increase the balance of the asset to ensure the availability of your service.
4. Error Message
If there is any error in the above API, please classify it as the following error code:
| Error Message | Error Message | Types of errors |
|---|---|---|
| 11000 | Parameter error. | Request parameter error. |
| 11001 | No permission. | payee_id No authority. |
| 11002 | This payment is unavailable. | Unable to pay, such as an internal error in the system, or a sudden influx of bots into a large number of transactions, resulting in insufficient assets to transfer. |
For example, when the payee_id has no permission to use your service, response will be:
{
    "code": 11001,
    "success": false,
    "message": "No permission",
    "data": []
}
Step 3: Notify order completed
When the payment is successful through the payment link your provided from the mixpay/create_order response, MixPay does not know whether the order has been paid successfully or not, so you need to notify MixPay to mark the order as paid.
MixPay determines the order has been paid totally based on the receipt of your Mixin robot transfer. When transferring, please attach the data of the parameters passed when MixPay calls the API mixpay/create_order , which will be explained later in detail.
1. Send money to MixPay
You need to use Mixin's transfer method to provide the currency and corresponding information to MixPay. In Mixin's transfer doc, we can see that you must carry the following parameters:
{
  "asset_id":     "the asset's asset_id which you are transferring",
  "opponent_id":  "the user's user_id who you are transferring",
  "amount":       "e.g.: "0.01", supports up to 8 digits after the decimal point",
  "pin":          "Encrypted PIN",
  "trace_id":     "Used to prevent duplicate payment, optional",
  "memo":         "Maximally 200 characters, optional",
}
The above parameters asset_id , amount , trace_id , memo , and opponent_id are used to request the Mixin payment API. MixPay has sent the content corresponding to these parameters when requesting the mixpay/create_order API.
The parameter pin is the content of the APP SESSION when you create the robot in Step 1.
2. Monitor incoming transfer
Normally, when MixPay receives your transfer, it will mark the order as paid. However, if the payment fails due to some anomaly, MixPay will refund the crypto asset to you.
For example, if the transfer is not completed within the time specified by MixPay, MixPay will determine that the payment timed out and return the current asset directly to your Mixin bot account. You can view the request data of mixpay/create_orderin Step 2 by the parameter requested by MixPay expired_at.
In this regard, you need to monitor the account transfer state of your Mixin robot to ensure that after receiving the refund of MixPay, you can refund it to the end user in time.
3. Refund logic
MixPay attaches the refund order information to the returned memo - the trace_id used when transferring. You need to use trace_id to confirm which order is refunded. The specific format of Memo can be found here . Of course, the reason for the refund is not necessarily timeout, there may be more, see here .
You may receive a transfer from the MixPay bot and get the following memo :
UkZ8MTJjNTU1NzUtYzg1YS00YjU4LWEyNDUtNzllNmI2NzhlZWU5fDQwMDI1
Using Base64 Decode analysis, we can get:
RF|12c55575-c85a-4b58-a245-19e6b678eee9|40025
Respectively correspond to:
RF (Refund)|trace_id|error_code
All possible error_code can be found in this link - Error Codes .
Step 4: Turn on the necessary configuration
After completing the above three steps, congratulations, MixPay users can already use your payment tool to pay.
The last step only requires you to provide the following information to the MixPay team:
The domain name used by the API you provided;
Walletfield is the value of your payment method, for example:binance.
Generally, you can contact your account manager. If there is no account manager, please go to Contact Customer Service - Help | MixPay Developer Documents , and someone in the group will assist you.
Frequently Asked Questions
Q: Why do I have to use Mixin to transfer money?
A: MixPay is developed based on the Mixin network. Using Mixin to transfer money can ensure instant arrival. In addition, there is no need to pay any fees for transfers within Mixin.
Q: Do I need to build a pool of funds on Mixin's side?
A: Yes. MixPay determines that the order is completed and depends on the transfer between Mixin bots. Your Mixin bot needs to transfer assets to MixPay's bot, in order to confirm the payment order has been completed. Please see "Step 3: Notify order completed" for more detail.
Q: How to put funds into my Mixin robot?
A: You can use our Paylink .payeeId is Step 1's client_id when you create the bot, and settlementAssetIdis the asset you support.
Q: How to monitor the incoming transfer to my Mixin bot?
A: There are two ways. The first is to use Mixin's Websocket to listen for Transfer type messages. The second is to poll the Read Snapshot List API, which will only return your robot-related transfers. Checking the response memo filed, we already explained in the above "Refund logic" section.